A little foto story: how to produce a belt basis: here
The form of the belt
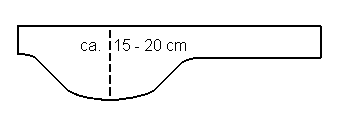
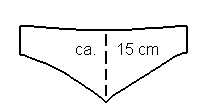
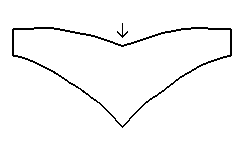
First I chose the shape for the belt. There are two favourite standard models: the Egyptian shape, narrow in the front, wider in the back (the wide part is the back) and the Turkish shape with a triangle in the front and in the back.
|
|
|
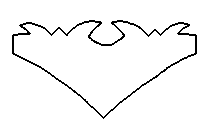
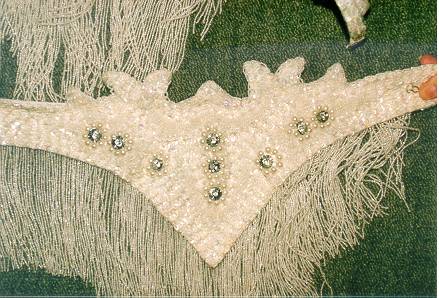
Often, this design features tips or waves along the top edge, which are not so easy to shape. You have to cut out the form and then to enhance the edge with florists' wire. Simple pliers are very helpful for this purpose - a challenge for those of you who like doing fiddly things.
Both designs can be combined, a triangle in the front and the wide Egyptian round shape in the back; this is especially recommended for women with a strong hollow back.
The shape is individually adapted to the figure. Tall strong women get a "bit more" of a belt, whereas the belt for slim and delicate ladies is a bit more narrow. The proportions should be right compared to the torso.
The front part of the Turkish design has a little bay around the belly. Therefore, front and back parts are not symmetrical, so when closing it you have to make sure you wear
it the right way around.
This 'belly bay' is not necessary, you can also do without it.
Then you have to measure the future length of the belt. Prepare a 'body' of several layers of cloth as basis for covering and embroidery. I use two pieces of a strong cotton material with a "Kalmuck" interlayer, a thick fluffy material used for padding restaurant tables. So the belt basis gains some substance.
These 3 pieces of cloth are pinned and zigzagged together. Also the edge is finished with narrow zigzag stitches.
Of course, you can use other materials as basis, such as even weave fabric, felt or an old bed cover.
The very stiff 'Schabracken-Vliseline' is not so suitable for belts, but perfect for making your own sequin ornaments (see there).
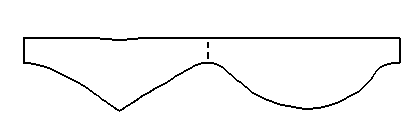
Now, the Turkish design is ready. The Egyptian needs some more darts - which are the secret behind well-fitting belts for hollow backs.
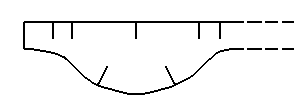
I cut into the top and bottom edge of the wide side 3-5 times app. 5-7 cm (2-2,5 inches) deep edge, arrange both edges overlapping app. for 4-6 mm (up to 0,2 inches) and zigzag the dart (from both sides, to be safe).
For hollow backs, you have to try on now and to adapt, if necessary.
Now: try on once more, perhaps it is much too long or too short, although the measurements were correct (the darts make the belt shrink a bit).
| Egyptian belt design | Turkish belt design | Turkish belt with "toothed edge" |
 |
 |
 |
The cover material
Now the basis is covered with cloth.
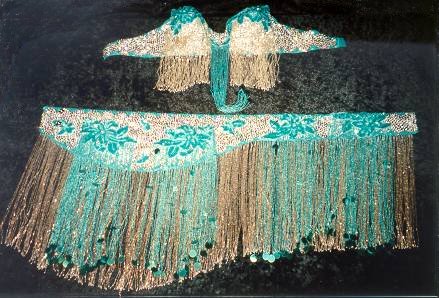
If I want to apply sequins and beads, I use elastic jersey or lycra in the same color as the costume. This material is available in dance garment shops (see "shopping links") in all frequent colors (or in department stores). 0.5 m (20 inches) is enough for belt and top.
You can also use sequin material and save a lot of time (however, sequin material is sensitive, so from wearing the color of the sequins will fade out more or less).
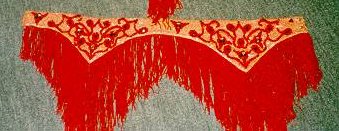
Other possibilities are brocade, lace, velvet and silk, etc. There are no limits for your phantasy, anything that looks nice and glitters is allowed.
If you are going to add embroidery, simply fix the cover with straight stitches and fold it over the edges, cutting into the round parts jutting out. I zigzag (my favourite stitch) the edge once more to make it stable. The ends are folded over and fixed with straight stitches.
You have to be a bit careful not to "flatten" the dome created by the darts when applying the cover, perhaps you have to add little darts in the cover material.
If you are not planning to cover the whole surface with embroidery, your seams must be invisible, which is a bit of work. Now you have to make up your mind on which side the belt shall be closed later. Most Egyptian costumes are closed on the left side, but there is no rule. (Often I was trying hard to find out which side was right, turned the belt basis around once more and fixed the cover on the other side - in the end it was the wrong one anyway!)
So, now you have a belt body (2 parts for the Turkish design). Who has managed to cover and nicely finish the Turkish tooth or wave edge, can really be proud.
Fasteners
Please fix them only after finishing the embroidery!
First the two belt parts have to be sewed together on one side. You have to try a bit to make sure that the teeth of the Turkish design end up exactly in the middle. I always place the front part on the back part so that the seam is invisible from the front. The underlapping part does not need embroidery.
I use strong hooks and eyes (as by Prym, hook and eye no. 12 in silver and black). Or you take pant fasteners (waist band fasteners). They are invisible (used for most Egyptian and Turkish costumes). You need at least 2 hooks and eyes for a belt (the hooks in the front part).
Copyright © 2000-2012 by Nadya - All rights reserved.
Last modified: