At last, now it's time for the fringes!
There is a variety of glass bead fringes, monochrome, in two colors, with sequins inbetween, multicolor, long, short, even in triangular shape. In most cases, you get strings of 1 m (39.3 inches) width.
For simpler training belts or decorating cloths, you can use textile fringes, which is quite a cheap alternative.
Most fringes come from Egypt or Turkey. In dance sport as well bead fringes are getting common, quite short, but cheaper and sometimes in rare colors.
Some like many fringes, as you feel them moving when you dance, and shimmies become more pronounced. Others use only few of them. There are fashion trends, sometimes many fringes are "in", sometimes not, and there are even purists who don't use any fringes at all.
Remember that turquoise fringes are almost inivisble on a turquoise skirt, for example. You may want this effect, so consider well which colors you will use for belt, fringes and skirt.
For a training belt, 10 cm (3.9 inches) fringes are sufficient. Longer fringes made from stick beads may break. How come? Well, with strong hip drops and twists the sharp edge of a bead may fray the thread. Sometimes the knots are not well made, and one string opens.
This risk is smaller with round rocaille beads.
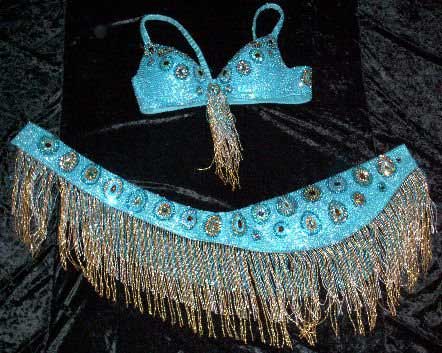
In general, I take 20 cm (7.9 inches) fringes for the belt and 10 cm fringes for the top.
Maybe 1 m (39.3 inches) x 20 cm (7.9 inches) fringes is not enough. Then you divide the string in two halves and place each part in the middle of front and back of the belt (along the lower edge, with buttonhole thread) and the free parts to the right and left side are filled with 10 cm fringes, as in most cases you need less than 1 m (39.3 inches) for the top.
You can also fix the fringes in diagonal lines on top and belt. In this case, you may sew fringes on the lower edge of the belt as well, but you don't have to.
Or you apply additional fringes to the lower edge, perhaps in a different color. These are placed on some spots below sequin or other ornaments. You can do whatever you like.
If you have to cut fringes into shorter portions, 1-2 strings will fall off (use the beads for embroidering). I apply some nail enamel or glue on the ends to avoid fraying out.
For arranging the fringes on the top, best work with the "living model". Take on the skirt, the belt with fringes and the top, then hold the fringes to the top, try around and pin them until you have the nicest version.
I like the V shape following the décolleté. Sometimes you can fix an additional piece on the lower edge in the middle of the front to emphasize the tip of the V. Adjust the length of the fringes to the figure.
|
|
|
Stringing up fringes yourself, my experience:
I have never made fringes myself, but sometimes I made some ornaments of large wax or plastic pearl. In most cases, the quantity of loose beads is as expensive as the ready-made fringes.
Here some instructions: prepare beads and buttonhole thread, and in addition a kind of cord for fixing the fringes, as with the ready-made fringes. Now make a thick knot, string the beads up to the desired length, fix the string in the cord (or directly on the costume). Best fix the knot with nail enamel or glue from below.
Or: string up the beads in the desired length, take the last one as end piece and go back through all other beads, fix everything. This works only with larger beads allowing for needle and thread to pass twice.
Stringing up fringes, a good hint from André Elbing:
The problem with stringing up fringes is that you need quite a thick thread which cannot pass through the bead together with the needle.
The solution is the following description:
First you string up as many beads as possible on an endless thread, with a thin needle and a thin thread. After this, you knot the stronger fringe thread (buttonhole thread, thick yarn, fishing line) to the thin thread and push the beads from one thread over to the other!
The fringe thread can be quite long. With stick beads, however, you have to be careful, as they may have sharp edges, which is not the case with round rocailles. Make a knot on the bottom end (dip it into nail enamel/glue), then knot a thin thread onto the other end and push the beads over. Sometimes it goes smoothly, sometimes a bead likes to stick to the knot if it will not move, simply crush it with the pliers. Careful: Splinters may damage the knot or the thread.
Best is to mark the desired length on the table to facilitate measuring. Now cut the thread and fix the fringe to the costume or to a cord. Make a new knot and start pushing the beads over.....
You can also string up fringes of double length and fix them in the middle.
Sounds easy, doesn't it?
Then go on!
NEW: Being creative with beaded fringes - tipps for beading and "crocheting together" from Sha-ri (thanks!)
Everybody who has got involved with beaded fringes will soon realize that there are generally two types of fringes - the Egyptian and the Turkish ones.
Egyptian fringes are usually quite dense, they are made of short buglebeads (cut) and - the most important thing concerning processing: they are mounted onto a kind of cord (similar to shoe laces).
Turkish fringes are often made of seedbeads, often not as dense and the single fringes are connected with crocheted chains.
The important thing is that, with the Turkish fringes, the individual lines can be separated and crocheted together again, whereas the Egyptian fringes cannot be reworked (at least I haven't found out how to do that.)
Making beaded frings yourselves
In principle, I can only tell you to carefully think twice, if you want to make fringes yourselves. First of all the supplies are not inexpensive - but, what is even worse, is the amount of time that it will take. It is possible that you will have to spend some weeks for a single costume!
Once in a while it can't be avoided, since either the colour of fringe that you are looking for can't be found or because you are looking for extravagant fringes with special endings, flat sequins or maybe as V-fringes with steps or something similar and you simply can't get them. For exotic bead colours I can recommend http://www.beadreaming.com. According to my experiences this is the best assorted shop for seedbeads of all colours!
Well, enough prefacing, here are the instructions:
I thread my fringes as Turkish ones so that I can vary them later on.
First of all I use seedbeads and buttonhole thread as supplies. Since the fringes have to bear a lot, I take the yarn twofold - so it is recommandable to look in your closest Turkish shop for the big bobbin - you won't get very far with the 30 m bobbins, beside that they are extremely expensive.
At first I cut the yarn:
Each threaded fringe must be twice as long as the hanging length should be in the end. Therefore the yarn must be (since it should be taken twofold) taken four times the desired length. Beside that you must add the length for the knot - that means that you have to add another 10 cm of yarn.
The calculation is: x cm hanging fringes = 2 * x cm beaded fringes = 4 * x + 10 cm buttonhole thread per fringe.
For beading I use a pearl needle, this has two advantages: first of all they are rather long and you get more beads on the needle in a faster time.
Secondly, even if you own a special sewing needle where the beads get onto, it often happens with 2 mm seedbeads of a bad quality that every 10th bead gets stuck on the needle - and that slows you down enormously!
Next step is tinkering a little: the yarn must get into the eye of the needle. It is absolutely possible to get the buttonhole thread into the beading needle, but usually the needles are a little unsteady - of 5 needles I own, only 2 have eyes that are large enough.
Threading: It is not possible to get the thread freehand into the eye, a needle threader won't help you either! For all who can't imagine how to get that thick yarn into such a small eye, here's the how-to:
The yarn must be cut with sharp scissors so that it doesn't fray right in the beginning.
Then I moisturize the yarn (yes, with spittle), I roll it togehter and press it tightly between thumb and index finger, so that it can't be seen anymore. Then I take the needle, put it in front of the place where the end of the yarn is between my fingertips, open the fingertips very, very slowly and move the end of the yarn and the eye to each other. With a little bit of luck the yarn gets a little into the eye. Now grasp with your fingernails and draw through - you're done!
Sometimes the eye is too small. You will notice that, when you finally made the yarn go into the eye at drawing, the needle gets tattered. Then you should try it with another needle, sometimes you are lucky with the next one.
Then you string the yarn: First of all you knot together the ends of the yarn and fix it with nailpolish. I have my beads in a little bowl (to be exact; a small bread box ;-) ) and plough through the box with the needle a few times so that the beads slip onto the yarn. Then I go on ploughing.
Check the length of the fringe with a tape measure, knot it, cut it, glue it - next one.
The whole thing takes a lot of time. Depending on the length of the fringe, it takes me 5 to 7 minutes per fringe. I already tried to plough with multiple needles at a time, but I wasn't faster that way.
Crocheting bead fringes
Either you have made your fringes yourselves or you have Turkish fringes that you have separated.
If you buy ready-made Turkish fringes, here's a little hint for you: Please check the ratio of number of fringes/meter/price.
Usually the cheap fringes are crocheted very thin. A little clue: at Neijla's the fringes usually have 150 single strings resp. 300 hanging strings per meter.
Now we come to crocheting: I use buttonhole thread for that, too. This has the advantage that the density of fringes can be regulated by the chain stitches inbetween and the string gets nice and thin and you can sew it on the costume very well and hide it between the stitchings.
Choosing the chrocheting yarn is not that important - you can use a simple 1,5 mm or 2 mm one. When using larger hooks, you can tighten the stitches.
Crocheting - simple version
I usually crochet 2 to 3 stitches in advance, then take one fringe, put it over the yarn, fold the edges together and look for the center of the fringe, hook my crocheting yarn between two beads and make the next stitch with my fringe inbetween.
Referring to the density of the fringes, you can experiment. With one chain stitch you get super-dense fringes. I usually make two stitches inbetween, 3 stitches is also okay.
When the fringes get skew at stitching them on they get a little denser, but you can also take the stringes more or less tight, this makes also a little difference.
The simple crocheting version has as result the fringes, where the double strings are lying one after another, therefore they always seem to be quite thin when they are hanging loose. As soon as they are lying on an underground, the rear string gets pressed to the front and suddenly they are a lot denser! When you want to stitch them on somewhere - no problem!
But if they are at the end of the belt, I even myself have the problem with the Egyptian belt form and a bigger buttock that the rear fringe string likes to hide itself. But there is help for that problem:
Crocheting for big mouths ;-)
Generally this works like the simple crocheting version, but after having chrocheted the fringe with a chain stitch in the string, the one half of the fringe is relocated between thread and needle (either the rear one to the front or the front one to the backside, but please make it consistently within one project) and the next stitch is made.
Thereby both halves of the fringe get on one side of the crocheted chain and are not one after another anymore but besides each other and already look denser.
Special Effects
Well - why all that work when you can buy the fringes ready-made? There are some reasons:
Tightening fringes - maybe you found some very cheap fringes, but they are quite thin. By re-chrocheting you can make them denser, e. g. out of 2 times 1 m (this will be super-deluxe-fringes) or 3 times 0,5 m stringes just one.
Colour gradients - maybe you want to make two or more changing colours and can't buy them or maybe only with a very long delivery time? Then it will help to buy the different colours and crochet them alternating. This also works very good for working up fringe rests!
Steps - this also looks very beautifully, when the fringes have ends with different colours or flat sequins, but it is also suitable for working up fringe rests of different lengths. Either you have fringes in different lengths and crochet them variantly, or you hang the fringes asymmetrically, e. g. for a 40 cm string (originally a 20 cm fringe) with 15 cm on one side and 25 cm on the other side onto the crocheting yarn.
For step-fringes it is more beautiful to crochet them a little denser, since the longer steps get thinner.
Elongating fringes - this is sometimes useful when you misjudged the length of the fringes. You can make 20 cm fringes out of 10 cm ones by only putting the first bead over the crocheting yarn. This will get a little knobbly, but it is quite useful for the lower fringe row on the belt. Alternatively you can also thread all beads below the knot with a needle onto the crocheting yarn and crochet then.
The important thing about that is that you need a really sufficient amount of fringes, since the length of the string gets reduced to the half!
And then you can make wild experiments!
 Here's a picture of my first "special fringes".
I had about half a meter of 10 cm ones and 20 cm ones left in two different colours. Furthermore I bought half a meter of 15 cm fringes of another colour and crocheted all those alternatively in steps and tightened them a little.
You won't find such a colour gradient somewhere else!
Copyright © 2000-2012 by Nadya - All rights reserved.
Last modified: